Best 5 Solutions For Dxgmms2.sys Error On Windows 10
This article will show details regarding dxgmms2.sys. Blue screen problem appears to be a nightmare for some users. And one of the blue screen mistake codes that bother most Windows users is the mistake dxgmms2.sys. Usually, the mistake appeared with other stop codes accompanied, such as SYSTEM_SERVICE_EXCEPTION, SYSTEM_THREAD_EXCEPTION_NOT_HANDLED dxgmms2.sys, and so on.
Best 5 Solutions For Dxgmms2.sys Error On Windows 10
In this article, you can know about dxgmms2.sys here are the details below;
Well, what causes the dxgmms2.sys blue screen mistake? How to fix dxgmms2.sys stopped working mistake? The following has summed up some possible reasons and reliable options.
What Causes Dxgmms2.sys BSOD Error
The dxgmms2.sys file is a Windows system chauffeur file connected with the Graphics Rendering functions of a computer. If there is an old, damaged graphics card chauffeur on your Windows PC, you may receive dxgmms2.sys blue screen mistake when playing a video game or motion picture.
Besides, if there are other issues like RAM or hard disk issues, incompatible firmware, you may also encounter the dxgmms2.sys BSOD mistake.
Luckily this is not a complex issue. Suppose you can boot into Windows on the computer with dxgmms2.sys mistake or enter safe mode, you can attempt the following solutions to eliminate the mistake.
Service 1. Reinstall Graphics Card Drivers
As discussed before, if the Graphics Card Chauffeur on your PC is damaged or corrupt, you might encounter the blue screen mistake dxgmms2.sys. Besides, numerous users reported that the dxgmms2.the newest NVIDIA graphics motorist brought on sys BSOD mistake. In this case, you can follow the actions listed below to reinstall the NVIDIA Graphics card motorists.
Here is the tutorial.
Step 1. Right-click the Windows Start menu, and after that, choose the Gadget Manager from the context menu.
Step 2. On the Device Supervisor window, expand Display adapters, then the NVIDIA graphics motorist, and select Uninstall gadget.
Step 3. Click Uninstall to validate your operation in the pop-up window and follow the prompts to uninstall the motorists.
Step 4. Some users suggest that using the 347.88 construct NVIDIA driver can fix dxgmms2.sys error. So you can undertake and click on this link to download the chauffeur.
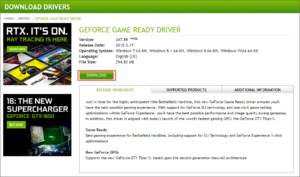
Step 5. After the download has been completed, just follow the on-screen guidelines to set up the graphics driver and reboot your computer.
There are five security vulnerabilities discovered in Nvidia motorists for Windows. Nvidia urges Windows users to upgrade GeForce, NVS, Quadro, and Tesla Drivers now.
Service 2. Run DirectX Diagnostic Tool
The dxgmms2.sys mistake is associated with DirectX Graphics APIs. Well, you may wonder: what is DirectX?
DirectX is a set of application shows interfaces (APIs) developed by Microsoft to handle tasks related to multimedia applications such as 3D video games and HD videos. So, if you come across problems such as dxgmms2.sys BSOD mistake when playing a video game or videos, you need to try to run the DirectX Diagnostic Tool to repair the issue.
To run the DirectX Diagnostic Tool on Windows 10, you can type dxdiag in the Windows 10 Cortana search box and click the best match. Then follow the prompts to run the tool and fix the issue.
Service 3. Modification of the TdrDelay Value in Registry
The blue screen error dxgmms.sys error can take place due to graphics drivers not responding. At this TimeTime, you can fix this problem by changing the TdrDelay value in your pc registry. If you do not know how to alter it, you can follow the actions listed below to try.
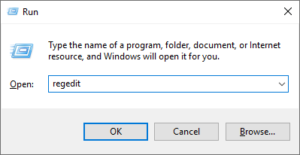
Step 1. Press Windows Key + R keys on the keyboard to bring up the Run dialog box. Then type regedit and struck the Enter key.
Step 2. Copy and paste the following path to the address bar in the Computer registry Editor.
HKEY_LOCAL_MACHINE \ SYSTEM \ CurrentControlSet \ Control \ GraphicsDrivers.
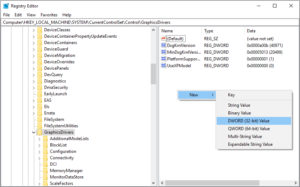
Step 3. In the best pane, try to find TdrDelay worth. If this value isn’t offered, you can produce one: right-click the space in the ideal pane and select Brand-new > DWORD (32-bit). Call it TdrDelay.
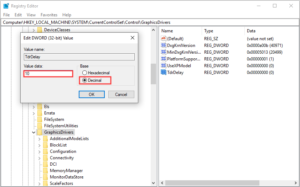
Step 4. Double click TdrDelay. Set Base as Decimal and change its Worth information to 10. At last, click OK to enable the changes.
Then you can exit Registry Editor and check this avoids dxgmms.sys error from appearing on your PC.
Service 4. Disable Hardware Velocity.
The hardware acceleration function is extensively used for optimizing computer efficiency, but often it could cause dxgmms2.sys blue screen error. Although you do not have access to alter hardware acceleration in Settings on Windows 10, you can disable it by modifying Registry.
If you do not understand how to disable hardware velocity, you can try to fix the dxgmms2.sys mistake by disabling it with the following steps.
Here are the comprehensive actions.
Step 1. Right-click Windows 10 Start menu and pick the Go to raise the Run dialog box.
Step 2. In the run box, type regedit and click OK.
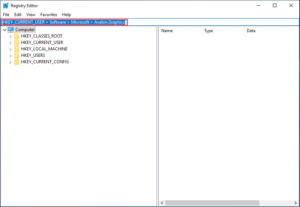
Step 3. Copy and paste HKEY_CURRENT_USER > Software > Microsoft > Avalon.Graphics to the address bar to open it.
Step 4. Discover DisableHWAcceleration on the right pane. If you can not discover DisableHWAcceleration, you can produce one: right-click on the void on the right pane and click New > DWORD (32-bit) Worth and name it DisableHWAcceleration.
Step 5. Double-click on DisableHWAcceleration and set its worth to 1 to disable hardware velocity on your Windows 10.
Step 6. At last, click OK to conserve the setting.
Then you can reboot your computer system and check if the dxgmms2.sys BSOD mistake disappears. Nevertheless, if disabling hardware acceleration can not help you, you can try the next service.
Service 5. Reset BIOS Configuration.
Resetting BIOS settings may assist you in fixing the blue screen dxgmms2.sys mistake. If the above repairs can not help you, you can try resetting BIOS by following the actions listed below.
Step 1. Reboot your PC and press a specific key on the boot screen to go into BIOS. Typically the hotkeys to go into BISO are Erase, F2, ESC, and so on; however, often, it can be different due to different motherboard manufacturers.
Step 2. Use the arrow keys on your keyboard to discover and pick the Load Setup Defaults alternative. Sometimes the alternative is also called Reset to Default, Factory Default, or Setup Default.
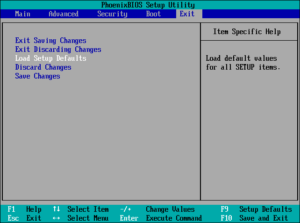
Tip: If you do not find the Load Setup Default’s choice, you can also hit the F9 key to restore the default BIOS settings.
Step 3. Click Yes to ensure that you wish to fill the default configuration now.
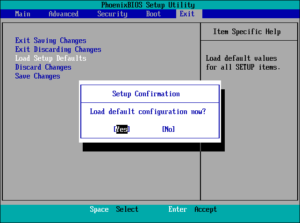
Step 4. Press F10 to save the modification and reboot your PC.
After resetting BIOS setup, you can restart your PC and check if dxgmms2.sys blue screen error gets repaired.
I effectively fixed the dxgmms2.sys BSOD error after trying some fixes pointed out in this post. I wish to share this post with more good friends who have encountered the same blue screen issue. Click to tweet.
The above fixes can only work when you can boot into Windows 10 after experiencing the error dxgmms2.sys. However, if you can’t boot into Windows after receiving this mistake, you might require to recuperate information from the bothersome computer system immediately.
If you don’t understand how to recover data from the PC, you can describe the following actions.
Conclsuion:
After reading this post, you should know how to fix dxgmms2.sys BSOD mistake. Which service works for you? Do you have much better services? If you do, please do not be reluctant to show us.
If you have any concern about how to repair error dxgmms2.sys or how to recover information from hard disk with MiniTool Partition Wizard Pro Ultimate, you can leave a message on the list below the comment zone, and we will reply as soon as possible. If you require any assistance when using the MiniTool software application.
Check out over other articles like: